10 Festive Royal Icing Christmas Cookie Designs to Try
Get ready to deck your halls with some of our sweet cheer! Royal icing Christmas cookies are festive delights that bring a fun, creative twist to your holiday baking. From classic shapes to dazzling designs, these cookies are perfect for decorating with friends or making memorable treats for loved ones. Let’s get busy with these ten delightful recipes that will make your holiday season a little sweeter!
Candy Cane Cookies with Striped Icing
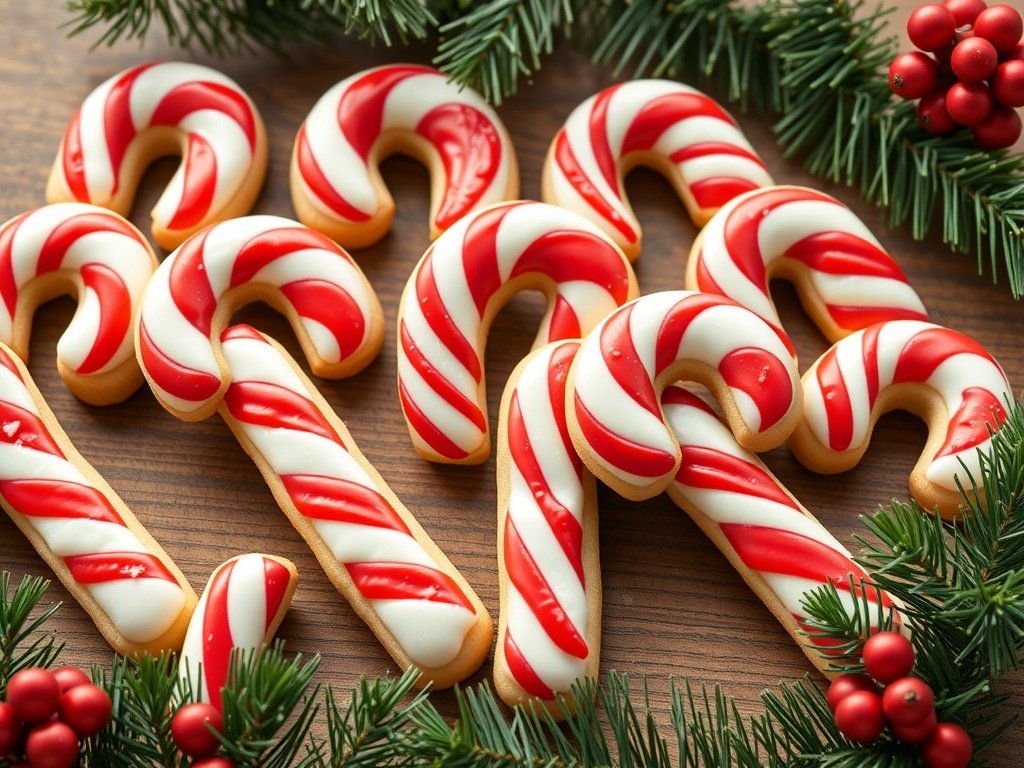
Candy cane cookies are a festive treat that brings holiday cheer to any gathering. These cookies are shaped like classic candy canes and decorated with vibrant red and white striped icing. The combination of flavors and colors makes them a delightful addition to your holiday cookie platter.
The cookies have a buttery, melt-in-your-mouth texture that pairs perfectly with the sweet icing. The red and white stripes not only look great but also add a fun twist to traditional holiday cookies. Placed alongside pine branches and berries, these cookies create a beautiful holiday display.
Ingredients
- 1 cup unsalted butter, softened
- 1 cup powdered sugar
- 1 egg
- 1 teaspoon vanilla extract
- 2 1/2 cups all-purpose flour
- 1/2 teaspoon salt
- 1/2 teaspoon peppermint extract
- Red and white royal icing
Instructions
- Make the Dough: In a large bowl, cream together the softened butter and powdered sugar until light and fluffy. Beat in the egg and vanilla extract. Gradually add the flour and salt, mixing until a dough forms.
- Flavor the Dough: Divide the dough in half. Add peppermint extract to one half and mix well. Leave the other half plain.
- Shape the Cookies: Roll small pieces of each dough into ropes. Twist a red and white rope together to form a candy cane shape. Place on a baking sheet lined with parchment paper.
- Bake: Preheat your oven to 350°F (175°C). Bake the cookies for 8-10 minutes or until lightly golden. Let them cool completely on a wire rack.
- Decorate: Once cooled, use the red and white royal icing to create stripes on the cookies. Allow the icing to set before serving.
Christmas Tree Cookies with Edible Glitter

Christmas tree cookies are a festive treat that brings joy to any holiday gathering. These cookies are shaped like Christmas trees and are decorated with colorful royal icing and edible glitter. The vibrant colors and sparkling finish make them a delightful addition to your holiday dessert table.
Each cookie is unique, showcasing different designs and colors. You might find green trees adorned with red and white sprinkles, or blue trees with shimmering stars. The edible glitter adds a magical touch, making these cookies not just tasty but visually stunning as well.
Making these cookies is a fun activity for the whole family. Kids love to help with the decorating, and it’s a great way to bond during the holiday season. Plus, they make perfect gifts for friends and neighbors! We also have many other Christmas desserts you can check out here!
Ingredients
- 2 3/4 cups all-purpose flour
- 1 teaspoon baking powder
- 1/2 teaspoon salt
- 1 cup unsalted butter, softened
- 1 1/2 cups granulated sugar
- 1 large egg
- 1 teaspoon vanilla extract
- 1/2 teaspoon almond extract
- Royal icing (various colors)
- Edible glitter
- Sprinkles (optional)
Instructions
- Preheat your oven to 350°F (175°C). Line baking sheets with parchment paper.
- In a bowl, whisk together flour, baking powder, and salt. Set aside.
- In a large bowl, cream together the softened butter and sugar until light and fluffy. Add the egg, vanilla extract, and almond extract, mixing well.
- Gradually add the flour mixture to the wet ingredients, mixing until a dough forms.
- Roll out the dough on a floured surface to about 1/4 inch thick. Use a Christmas tree cookie cutter to cut out shapes and place them on the prepared baking sheets.
- Bake for 8-10 minutes, or until the edges are lightly golden. Let them cool completely on a wire rack.
- Once cooled, decorate the cookies with royal icing in various colors. Add edible glitter and sprinkles for that extra sparkle!
Santa Hat Cookies with Whipped Icing
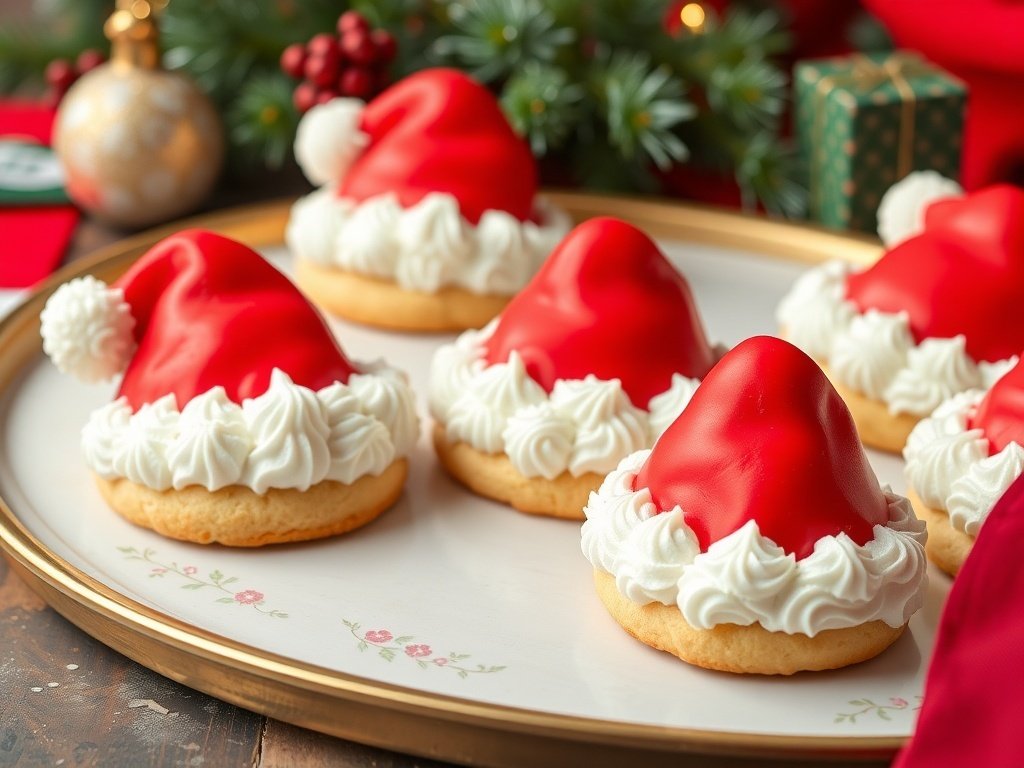
These Santa Hat cookies are a delightful treat for the holiday season. Each cookie features a soft, buttery base topped with a bright red icing shaped like Santa’s hat. The fluffy whipped icing around the base adds a festive touch, making these cookies perfect for any Christmas gathering.
To make these cookies, you’ll need simple ingredients that come together quickly. The combination of the sweet cookie and the rich icing creates a fun and tasty holiday treat. Kids and adults alike will love them!
Ingredients
- 2 ½ cups all-purpose flour
- 1 teaspoon baking powder
- ½ teaspoon salt
- 1 cup unsalted butter, softened
- 1 cup granulated sugar
- 1 large egg
- 1 teaspoon vanilla extract
- Red fondant or red icing
- 2 cups whipped cream or whipped topping
- Mini marshmallows for decoration
Instructions
- Preheat the oven to 350°F (175°C). Line a baking sheet with parchment paper.
- In a bowl, whisk together flour, baking powder, and salt. Set aside.
- In another bowl, cream the softened butter and sugar until light and fluffy. Add the egg and vanilla, mixing well.
- Gradually add the dry ingredients to the wet mixture, stirring until combined.
- Drop spoonfuls of dough onto the prepared baking sheet, spacing them apart. Bake for 10-12 minutes or until the edges are lightly golden.
- Let the cookies cool completely on a wire rack.
- Once cooled, shape the red fondant or icing into cones to create the Santa hats. Place them on top of each cookie.
- Pipe or spread the whipped cream around the base of the hats to resemble the fluffy trim.
- Top each hat with a mini marshmallow for the finishing touch.
Ornament Cookies with Bright Colors

These ornament cookies are a festive treat that brings a splash of color to your holiday table. Each cookie is decorated with bright royal icing, showcasing classic holiday designs like snowflakes and ornaments. The vibrant reds, greens, and blues make them not just delicious but also a feast for the eyes.
Making these cookies is a fun activity for the whole family. Kids will love helping out with the icing and choosing their favorite colors. Plus, they make great gifts or party favors, adding a personal touch to your holiday celebrations.
To create these delightful cookies, you’ll need a simple sugar cookie base and royal icing in various colors. The process is straightforward, and the results are sure to impress your guests.
Ingredients
- 2 3/4 cups all-purpose flour
- 1 teaspoon baking soda
- 1/2 teaspoon baking powder
- 1 cup unsalted butter, softened
- 1 1/2 cups white sugar
- 1 egg
- 1 teaspoon vanilla extract
- 1/2 teaspoon almond extract
- 3 cups powdered sugar
- 2 tablespoons meringue powder
- Water (as needed)
- Food coloring (various colors)
Instructions
- Preheat the oven to 375°F (190°C). In a bowl, mix flour, baking soda, and baking powder. Set aside.
- In another bowl, cream together the butter and sugar until smooth. Beat in the egg, vanilla, and almond extract.
- Gradually blend the dry ingredients into the creamed mixture. Roll rounded teaspoonfuls of dough into balls, and place them on ungreased cookie sheets.
- Flatten each ball slightly with the bottom of a glass. Bake for 8 to 10 minutes in the preheated oven. Let cool on wire racks.
- To make the royal icing, beat together powdered sugar, meringue powder, and water until smooth. Divide into bowls and add food coloring as desired.
- Decorate the cooled cookies with the royal icing using piping bags or a simple squeeze bottle. Let the icing dry completely before serving or packaging.
Holly Leaf Cookies with Berry Accents

Holly leaf cookies are a festive treat that captures the spirit of Christmas. These cookies are beautifully decorated with vibrant green royal icing, making them look just like the real thing. The bright red berry accents add a pop of color, creating a cheerful and inviting appearance.
These cookies are not just pretty; they are delicious too! The combination of sweet icing and a soft cookie base makes them a favorite during the holiday season. They are perfect for sharing at parties or giving as gifts. Plus, they add a lovely touch to any holiday dessert table.
Making these cookies can be a fun activity for the whole family. Kids will love helping with the decorating, and you can get creative with different designs. Whether you stick to classic holly shapes or try out your own variations, these cookies are sure to impress.
Ingredients
- 2 3/4 cups all-purpose flour
- 1 teaspoon baking powder
- 1/2 teaspoon salt
- 1 cup unsalted butter, softened
- 1 cup granulated sugar
- 1 large egg
- 1 teaspoon vanilla extract
- 1/2 teaspoon almond extract
- Royal icing (green and red)
Instructions
- Make the Dough: In a bowl, mix flour, baking powder, and salt. In another bowl, cream butter and sugar until light and fluffy. Beat in the egg and extracts. Gradually add the flour mixture until combined.
- Chill the Dough: Wrap the dough in plastic wrap and refrigerate for at least 1 hour. This helps the cookies hold their shape when baking.
- Shape and Bake: Preheat the oven to 350°F (175°C). Roll out the dough to about 1/4 inch thick. Use a holly leaf cookie cutter to cut out shapes. Place on a baking sheet lined with parchment paper and bake for 8-10 minutes until lightly golden.
- Decorate: Once cooled, use green royal icing to cover the cookies. Add red icing dots for the berries. Let the icing set before serving.
Snowflake Sugar Cookies with Royal Icing
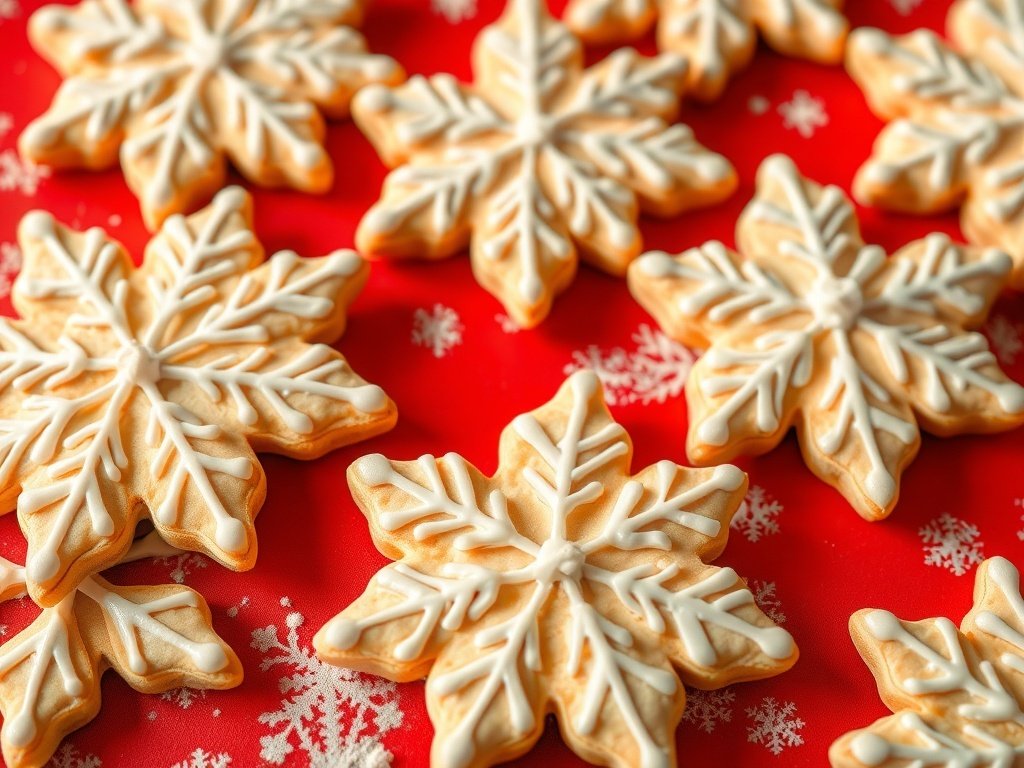
Snowflake sugar cookies are a delightful treat for the holiday season. These cookies are not just tasty; they are also a feast for the eyes. The intricate designs of snowflakes, created with royal icing, make them perfect for festive gatherings. The combination of soft sugar cookies and smooth icing is simply irresistible.
To make these cookies, you’ll need basic ingredients like flour, sugar, butter, and eggs. The royal icing adds a sweet touch and allows for beautiful decorations. Kids and adults alike will enjoy decorating these cookies, making them a fun activity for the whole family.
Once baked and decorated, these cookies can be displayed on a platter or given as gifts. They are sure to bring smiles to everyone who sees (and tastes) them!
Ingredients
- 2 3/4 cups all-purpose flour
- 1 teaspoon baking powder
- 1/2 teaspoon salt
- 1 cup unsalted butter, softened
- 1 1/2 cups granulated sugar
- 1 large egg
- 1 teaspoon vanilla extract
- 3 cups powdered sugar
- 2 tablespoons meringue powder
- 1/4 cup water (for icing)
Instructions
- Prepare the Dough: In a bowl, whisk together flour, baking powder, and salt. In another bowl, cream butter and sugar until light and fluffy. Beat in the egg and vanilla. Gradually add the flour mixture until combined.
- Chill the Dough: Divide the dough into two discs, wrap in plastic, and refrigerate for at least 1 hour.
- Roll and Cut: Preheat your oven to 350°F (175°C). Roll out the dough on a floured surface to about 1/4 inch thick. Use a snowflake cookie cutter to cut out shapes and place them on a baking sheet.
- Bake: Bake for 8-10 minutes, or until the edges are lightly golden. Let them cool completely on a wire rack.
- Make Royal Icing: In a bowl, mix powdered sugar, meringue powder, and water until smooth. Adjust the consistency with more water if needed.
- Decorate: Use piping bags to decorate the cooled cookies with royal icing. Let the icing dry completely before serving or storing.
Gingerbread Men with Detailed Icing Designs

Gingerbread men cookies are a classic holiday treat, bringing joy and warmth to any festive gathering. These cookies are not just delicious; they are also a canvas for creativity. The image showcases gingerbread men adorned with colorful icing and cheerful decorations. Each cookie has its own personality, thanks to the unique designs. The bright red and green buttons, along with the white icing accents, make them look inviting and fun.
Making gingerbread men is a delightful activity for families. Kids love to help decorate, making it a perfect way to bond during the holidays. The smell of ginger and spices wafting through the kitchen adds to the holiday spirit. Plus, these cookies can be packaged beautifully as gifts or used to decorate your home.
Here’s a simple recipe to create your own gingerbread men with detailed icing designs. Gather your ingredients and let’s get baking!
Ingredients
- 3 cups all-purpose flour
- 1 teaspoon baking soda
- 1 tablespoon ground ginger
- 1 tablespoon ground cinnamon
- 1/2 teaspoon ground cloves
- 1/2 teaspoon salt
- 1/2 cup unsalted butter, softened
- 1/2 cup brown sugar, packed
- 1/2 cup molasses
- 1 large egg
- 1 teaspoon vanilla extract
- 2 cups powdered sugar (for icing)
- 2 tablespoons water (for icing)
- Food coloring (optional)
Instructions
- Make the Dough: In a bowl, mix flour, baking soda, ginger, cinnamon, cloves, and salt. In another bowl, cream together butter and brown sugar. Add molasses, egg, and vanilla, mixing well. Gradually add the dry ingredients to the wet mixture until combined.
- Chill the Dough: Wrap the dough in plastic wrap and refrigerate for at least 1 hour. This makes it easier to roll out.
- Preheat the Oven: Preheat your oven to 350°F (175°C). Line baking sheets with parchment paper.
- Roll and Cut: Roll out the chilled dough on a floured surface to about 1/4 inch thick. Use cookie cutters to cut out gingerbread men shapes and place them on the prepared baking sheets.
- Bake: Bake for 8-10 minutes or until the edges are firm. Let them cool on a wire rack.
- Prepare the Icing: In a bowl, mix powdered sugar and water until smooth. If desired, divide the icing into smaller bowls and add food coloring for different colors.
- Decorate: Once the cookies are cool, use piping bags or a small spatula to decorate with icing. Get creative with patterns and colors!
Reindeer Cookies with Chocolate Antlers

These adorable reindeer cookies are a delightful treat for the holiday season. Each cookie is shaped like a reindeer, complete with chocolate antlers and a bright red nose. They are not only fun to make but also a hit at any Christmas gathering.
The cookies have a soft, buttery texture that pairs perfectly with the rich chocolate used for the antlers. The vibrant red nose adds a festive touch that makes these cookies irresistible. Kids and adults alike will love decorating and munching on these festive delights.
Making these cookies can be a fun family activity. Gather everyone in the kitchen, roll out the dough, and let creativity shine with the decorations. You can even create a cookie decorating contest to see who can come up with the most unique reindeer!
Ingredients
- 2 3/4 cups all-purpose flour
- 1 teaspoon baking soda
- 1/2 teaspoon salt
- 1 cup unsalted butter, softened
- 1 1/2 cups granulated sugar
- 1 large egg
- 1 teaspoon vanilla extract
- 1/2 cup chocolate chips (for antlers)
- 1/4 cup red candy (for noses)
Instructions
- Preheat your oven to 350°F (175°C). Line baking sheets with parchment paper.
- In a bowl, whisk together flour, baking soda, and salt. Set aside.
- In another bowl, cream together the softened butter and sugar until light and fluffy. Beat in the egg and vanilla extract.
- Gradually add the dry ingredients to the wet mixture, mixing until combined.
- Roll the dough into balls and shape them into reindeer heads on the baking sheet.
- Bake for 10-12 minutes or until the edges are lightly golden. Let them cool completely.
- Melt the chocolate chips and pipe them onto the cookies to create antlers. Use red candy for the noses.
- Let the decorations set before serving. Enjoy your festive reindeer cookies!
Nutcracker Cookies with Detailed Features

Nutcracker cookies are a festive delight that brings holiday cheer to any gathering. These cookies are shaped like the iconic nutcracker characters, complete with colorful royal icing that adds a fun touch. Each cookie features intricate details, from the nutcracker’s uniform to their charming facial expressions. The vibrant colors make them not only tasty but also a feast for the eyes.
Making these cookies is a great way to bond with family and friends during the holiday season. You can let your creativity shine as you decorate each cookie, choosing different colors and designs. They make perfect gifts or party favors, adding a personal touch to your holiday celebrations.
Ingredients
- 3 cups all-purpose flour
- 1 teaspoon baking powder
- 1/2 teaspoon salt
- 1 cup unsalted butter, softened
- 1 cup granulated sugar
- 1 large egg
- 1 teaspoon vanilla extract
- 1 teaspoon almond extract
- Royal icing (for decorating)
- Food coloring (various colors)
Instructions
- Prepare the Dough: In a bowl, mix flour, baking powder, and salt. In another bowl, cream together the butter and sugar until light and fluffy. Beat in the egg, vanilla, and almond extract. Gradually add the dry ingredients until combined.
- Chill the Dough: Wrap the dough in plastic wrap and chill in the refrigerator for at least 1 hour.
- Roll and Cut: Preheat your oven to 350°F (175°C). Roll out the chilled dough on a floured surface to about 1/4 inch thick. Use nutcracker-shaped cookie cutters to cut out shapes and place them on a baking sheet lined with parchment paper.
- Bake the Cookies: Bake for 8-10 minutes or until the edges are lightly golden. Let them cool completely on a wire rack.
- Decorate: Once cooled, use royal icing to decorate the cookies. Get creative with colors and designs to make each nutcracker unique!
Star Cookies with Metallic Icing

Star cookies are a festive treat that can brighten up any holiday gathering. These cookies are not just delicious; they also look stunning. The metallic icing gives them a shiny, elegant finish that catches the eye. Each cookie is shaped like a star, making them perfect for Christmas celebrations.
The cookies are decorated with a smooth layer of metallic icing, which can be gold or silver, adding a touch of glamour. Tiny white accents, like hearts or dots, enhance their charm. These cookies are great for sharing or as a centerpiece on your dessert table.
Making these star cookies is a fun activity for families. Kids will love helping with the decorating part, and you can get creative with different designs. The joy of baking together creates lasting memories.
Ingredients
- 2 3/4 cups all-purpose flour
- 1 teaspoon baking powder
- 1/2 teaspoon salt
- 1 cup unsalted butter, softened
- 1 cup granulated sugar
- 1 large egg
- 1 teaspoon vanilla extract
- 1/4 cup milk
- 1 cup powdered sugar (for icing)
- 2 tablespoons corn syrup
- 1/2 teaspoon vanilla extract (for icing)
- Gold or silver food coloring
Instructions
- Make the Dough: In a bowl, mix flour, baking powder, and salt. In another bowl, cream butter and sugar until fluffy. Add the egg and vanilla, mixing well. Gradually add the dry ingredients, alternating with milk, until a dough forms.
- Chill the Dough: Wrap the dough in plastic wrap and refrigerate for at least 1 hour. This helps the cookies hold their shape when baking.
- Shape the Cookies: Preheat your oven to 350°F (175°C). Roll out the chilled dough on a floured surface to about 1/4 inch thick. Use a star-shaped cookie cutter to cut out shapes and place them on a baking sheet lined with parchment paper.
- Bake: Bake for 8-10 minutes or until the edges are lightly golden. Let them cool completely on a wire rack.
- Make the Icing: In a bowl, mix powdered sugar, corn syrup, and vanilla. Add water a little at a time until you achieve a smooth, pourable consistency. Divide the icing and mix in food coloring to achieve your desired metallic shade.
- Decorate: Once the cookies are cool, drizzle the metallic icing over the cookies. Use a toothpick to create designs or add small white accents for extra flair. Let the icing set before serving.